The Mastercoin Developer’s Guide aims to be a comprehensive reference guide for Mastercoin developers. It provides a brief overview of Mastercoin, pointers to external Mastercoin documentation and resources, introductory information on the Mastercoin specification, and information on Mastercoin implementations and select applications.
1. Introduction to Mastercoin
1.1. Mission
The Master Protocol facilitates the creation and trading of smart properties and user currencies as well as other types of smart contracts. Mastercoins serve as the binding between bitcoins (BTC), smart properties and smart contracts created on top of the Master Protocol.
Mastercoin enables Bitcoin ecosystem service providers to function in decentralized and p2p mode. Adoption of the Master Protocol will drive higher value economic transactions on the Bitcoin blockchain, which is good for Bitcoin miners and savers.
For more information see the Mastercoin website
1.2. Features
-
Decentralized Exchange
The capability to trade bitcoins for other digital currencies without having to use a third party. Master Protocol makes this possible by leveraging the Bitcoin blockchain as the "third party" and using Bitcoin’s distributed timestamping service.
-
Smart Poperty
Smart properties are digital property and contracts rights, which may be transferred. Smart tokens can represent services, products, titles, deeds, virtual currencies, and securities.
Mastercoin Foundation plans and funds the development of the Master Protocol for the creation of smart tokens, and is involved in fostering adoption by services meeting the needs of people, governments and businesses.
-
User Currencies
Master Protocol enabled applications will allow anyone to design and release their own smart tokens, with their own rules, without doing any software development.
Crowd Sale type virtual currencies and smart tokens will be available as of April 22, 2014.
-
Savings Wallets
A savings wallet is a collection of saving addresses. The Saving Address feature is designed to increase hot wallet security while preserving ease of use.
The transactions sent from those addresses are reversible for the specified time period.
1.3. History
- January 6, 2012
-
J. R. Willett publishes Version 0.1 of The Second Bitcoin Whitepaper.
- August 1, 2013
-
Exodus Address begins receiving Bitcoins.
- August 31, 2013
-
"Exodus Address" stops receiving Bitcoins. 63,162.4 MSC are generated and sent to those who sent Bitcoins to the Exodus address. 56,316.2 development MSC are also genereated for a total of 619,478.6 MSC created. Additional MSC will not be created.
- ??
-
Major specification upgrade.
- ??
-
Major software release.
- 4/22/14
-
Maidsafe sale.
- NOTE
-
I want to have only 6-9 major milestones here to keep this short.
For more information see:
-
http://masterprotocoleducation.org/history-of-the-master-protocol/
-
http://blog.mastercoin.org/2013/11/29/a-brief-history-of-mastercoin/
- NOTE
-
Which of the above 3 links should we keep?
2. Overview of Ecosystem
This section provides an overview of the Mastercoin ecosystem with links to the relevant resources.
2.1. Implementations
There are multiple implementations of the Master Protocol available. Mastercoin Tools is the current reference implementation (which is used by OmniWallet). We have begun work on a new reference implementation Master Core, but it has not been released yet.
2.1.1. Mastercoin Tools
Mastercoin Tools is a set of Python libraries and command-line tools that in turn depends upon the SX command from libbitcoin.
For more information see the README on Github.
2.1.2. Master Core
Master Core is the new reference implementation for Mastercoin and is available in experimental form.
Maste Core is based upon Bitcoin Core — the reference implementation of Bitcoin. Mastercore adds support for the Master Protocol, while leaving the existing Bitcoin functionality unchanged.
2.1.3. Other
TBD
2.2. Notable Wallet Applications
There are a handful of Mastercoin-enabled wallets for web and desktop platforms. We’ll highlight a few of them here.
2.2.1. Omniwallet
Omniwallet is a major focus of development for the Mastercoin Foundation. You can find the https://github.com/mastercoin-MSC/omniwallet [source code and a helpful README] file on Github.
2.2.2. Masterchest
The Masterchest wallet is a desktop wallet for the Windows platform. See the source and README on Github,
2.2.3. Other
TBD
2.3. Notable Master currencies
2.3.1. Mastercoin
2.3.2. Test Mastercoin
2.3.3. MaidSafeCoin
2.3.4. Other
2.4. Mastercoin Documentation & Resources
3. Introduction to the Master Protocol
This section is TBD. For now your best starting point is the Specification itself.
3.1. Overview of key Mastercoin concepts and terminology
3.2. Review of key Bitcoin features used by Mastercoin
3.3. Introduction to the Specification and overview of it’s contents
4. Getting Started
The best way to get started is to build (install) and run one of our implementations.
4.1. Building and running a full Mastercoin implementation
We have produced Vagrant configurations for automatically creating VirtualBox Virtual Machines running recent versions of Mastercoin components and stable versions of prerequisite components.
4.1.1. Mastercoin-tools
Follow the instructions in Installing Mastercoin Tools on the install-msc repo. (In the vagrant branch for now.)
4.1.2. Mastercore (aka mastercoind)
Follow the instructions in Installing Mastercore on the install-msc repo. (In the vagrant branch for now.)
4.1.3. Omniwallet
TBD.
5. Mastercoin RPC API
The Mastercore implementation of Mastercoin includes an JSON-RPC API that allows access to key Mastercoin features over the HTTP(S) protocol. As Mastercore is based upon Bitcoin Core, the Mastercoin JSON-RPC API will be a superset of the API provided by Bitcoin.
The Bitcoin RPC API is documented in the Bitcoin API Calls List. This section documents the additional commands planned for addition by Mastercoin.
The Master Core RPC API Documentation is available on Github.
6. Contributing to Mastercoin
This section contains procedures and guidelines for contributing to Mastercoin. More sections will be added as they are created.
6.1. Using GPG keys for Git Commits
Siging your commits with PGP/GPG is recommended to help ensure your code is trusted when commiting upstream to the Mastercoin repository. To setup your key, you will need a copy of GPG for your OS: https://www.gnupg.org/
- Installation, key creation, and publishing
-
See the instructions for your Operating System below.
- Contact a developer
-
Contact another Mastercoin developer and have him or her verify the integrity of your key, so that we can include you in the Mastercoin web of trust.
- Committing code
-
Add your key to your git config with
git config --global user.signingkey key_identifierSign future commits withgit -S -m "(message)"If you’re using a Git GUI, see the instructions for your particular software for GPG signing.
6.1.1. Linux
To setup your key, you will need a copy of GPG for your OS: https://www.gnupg.org/
- Listing keys
-
gpg -korgpg --list-keyswill list all keys on your system. - Installation
-
After downloading and installing, run:
gpg --gen-keyand follow the prompts to generate your key. - Uploading your key to a keyserver
-
gpg --send-keys (key identifier)note: the identifier is a 4-byte hex value ex. "0xDEADBEEF"
6.1.2. Mac
- Recommeded Tools
- Installation and Setup
-
-
Download and run the GPG Suite Installer
-
Create a key pair and publish your public key
-
Open GPG Keychain Access
-
Click the New key icon to create a new key pair.
-
Enter your name and email address
-
Check Upload public key after generation
-
-
- Importing keys
-
-
Get the new developer’s Key ID via a trusted communications channel
-
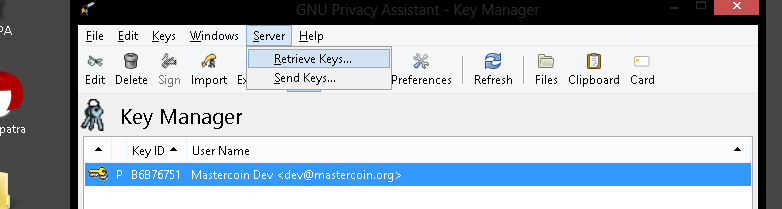
Use the Key / Retrieve from Keyserver…" menu in *GPG Keychain Access
-
Enter the Key ID and click Retrieve Key
-
- Signing keys
-
-
Select the key you want to sign in the GPG Keychain Access window
-
Choose the Key / *Sign…" menu
-
Indicate how carefully you have verified the key from the pop-up menu.
-
Click Generate Signature
-
Choose the *Send public key to Keyserver"
-
6.1.3. Windows
To setup your key, you will need a copy of GPG for your OS: https://www.gpg4win.org
- Downloading
-
Visit https://www.gpg4win.org/download.html and grab a copy of GPG4Win (22meg).
- Note
-
You may see an [SSL certificate problem](https://imgur.com/exdQ6nP) when downloading gpg4win (TBD: provide method to fix that or grab a secure copy)
- Installing
-
-
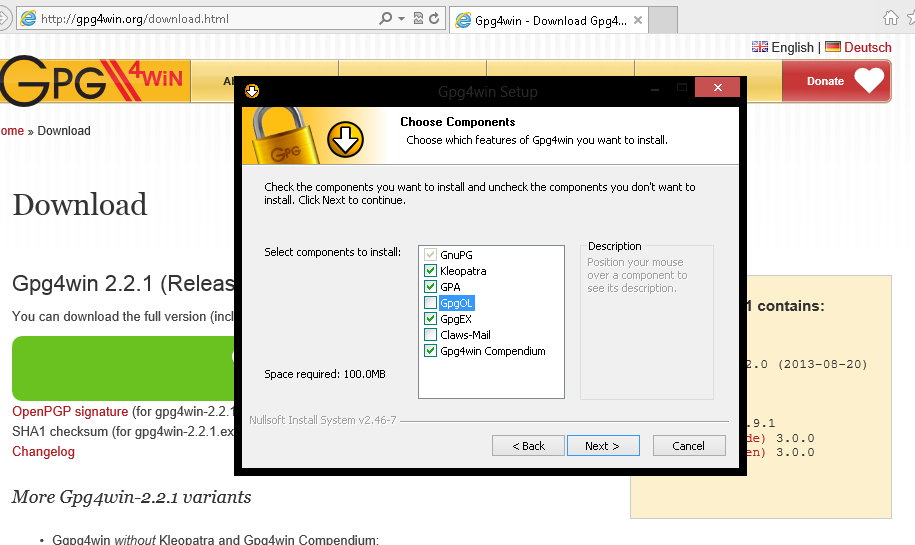
Make sure GPA is selected (Kleopatra not necessary) at a minimum, and proceed.
-
-
More installation default suggestions.
-
-
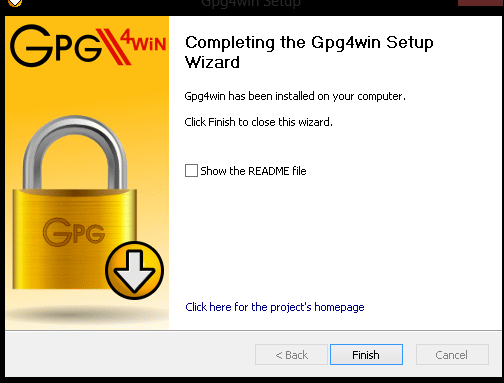
Hit finish to complete
-
-
- Using GPA
-
-
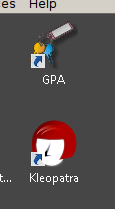
This is the GPA icon
-
-
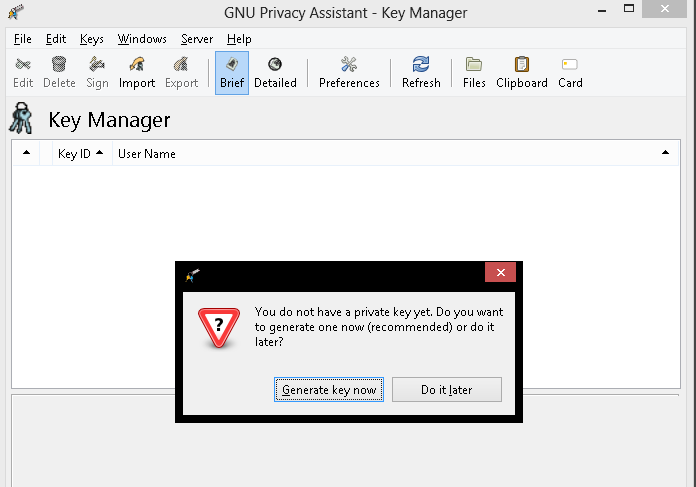
Hit generate key now
-
-
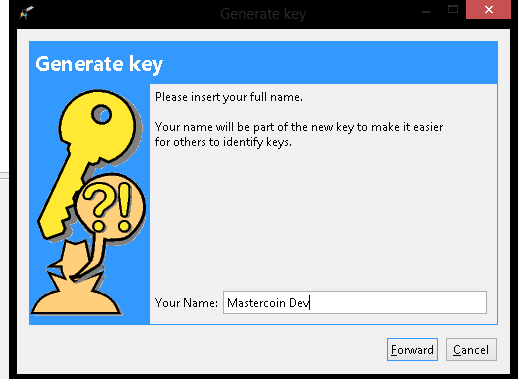
Insert your personal details
-
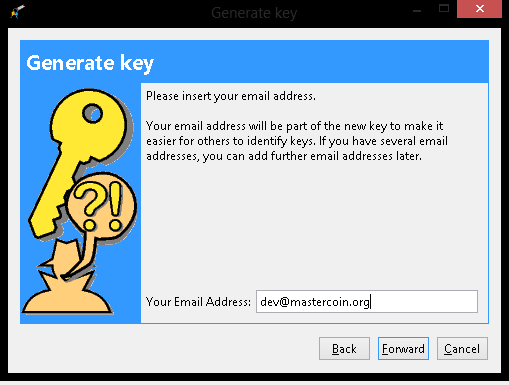
-
More details
-
-
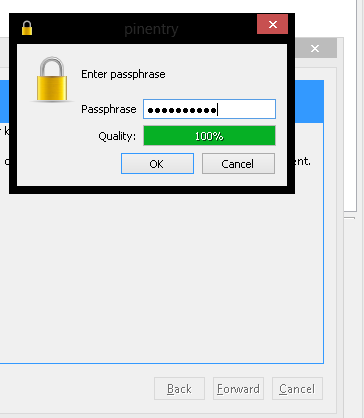
Important: Enter a secure passphrase, this will be used to sign commits, messages and so on
-
-
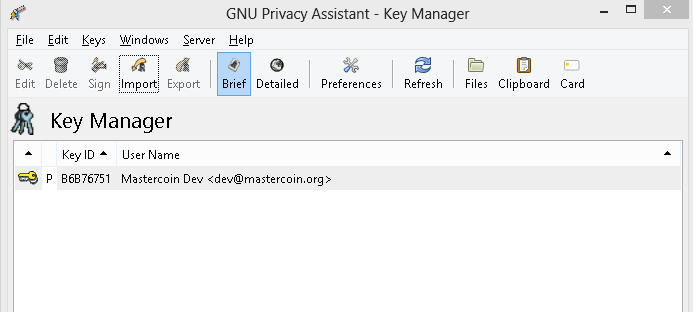
You will see your newly generated key after following the prompts
-
-
- Uploading to keyserver
-
-
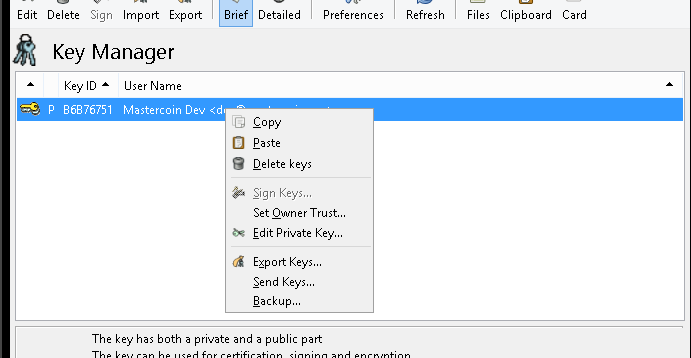
Right click your name
-
-
Click Send Keys
-
-
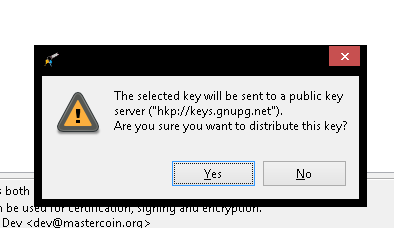
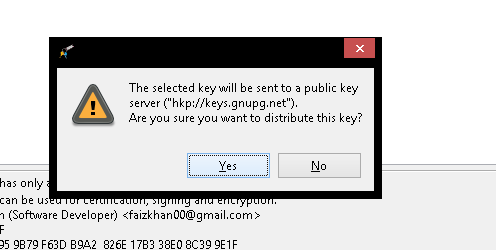
Hit OK to distribute your key
-
- Signing other keys
-
-
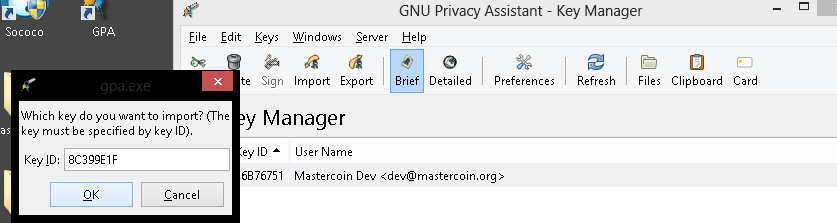
After verifying another person’s identity, add a key:
-
-
Enter their KEY ID:
-
-
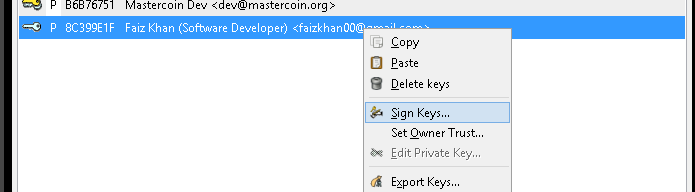
Right click and hover over Sign keys:
-
-
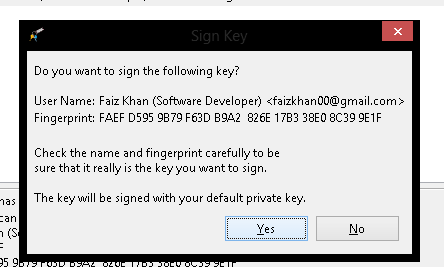
Agree to sign (if identity is verified)
-
-
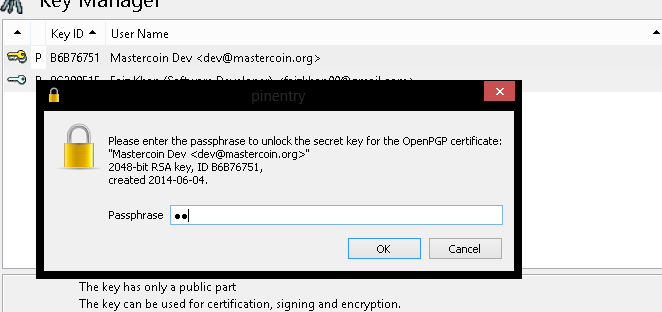
Enter your passphrase
-
-
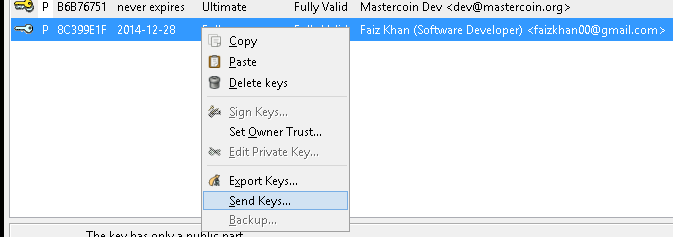
Right click the person’s key and hit send keys
-
-
Hit ok to distribute
-
-

All done!
7. How to improve this document
This document was created with AsciiDoctor a powerful markdown format especially suited for software project documentation. The markdown source is stored in the source branch of the [mastercoin-MSC.github.io] repository on Github in the file dev-guide.adoc.
The easiest way to make a change is to edit the file directly on Github. Github supports AsciiDoctor directly so just edit the file dev-guide.adoc.
If you want to check the file out with Git and work locally, there are browser plugins for Live Preview of Asciidoctor:
-
Asciidocgtor.js Live Preview for Google Chrome
-
Asciidoctor Firefox Addon for Mozilla Firefox.
- NOTE
-
The Google Chrome plugin works well, I haven’t tried the Firefox one yet.
There are many other tools and toolchains that support Asciidoctor, but the above are the easiest to get started with.